Rapid Prototyping combined with Additive Manufacturing for Replacement Parts
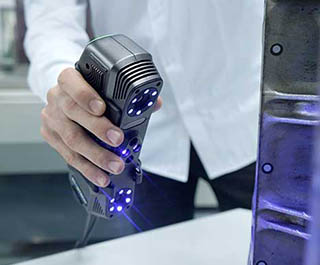
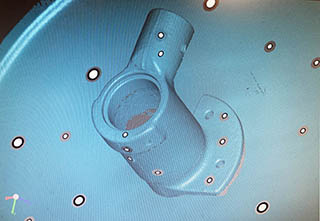
By using a Scan Tech scanner, it’s possible to scan objects in high detail to create a 3D model known as an “object mesh file.” The device uses advanced technology to capture the shape and texture of the object and convert it into a digital format. The resulting object mesh can be used for a variety of purposes such as 3D printing. With the Scan Tech device, creating a 3D model of an object is a fast and efficient process that can save time and effort compared to traditional methods.

New parts are printed with our 3D printer utilizing the mesh file. This is useful when the original parts are no longer available or when a customized version of the part is needed.
An object mesh file is a digital representation of a 3D object.
- It contains information about the object’s shape, structure, and texture.
- It provides a blueprint for the 3D printer to follow when creating the final part.
- The mesh file helps ensure accuracy and high quality of the final part.
- It can be used to identify potential issues with the design before printing.
- The mesh file is essential for optimizing designs for 3D printing.

Precision Measurement Techniques for Replacement Part Scanning
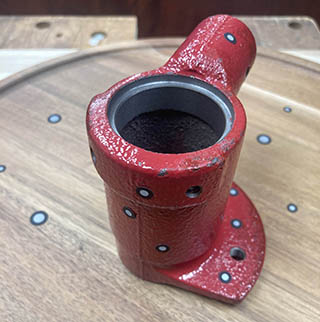
Reference points are placed on the object and the surrounding table prior to scanning. The reference points will orient the scanning process to provide data for building the new file.
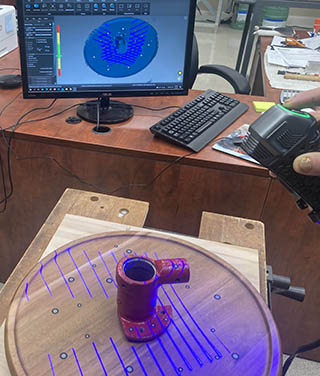
The scanning operation involves a thorough scanning using the portable Simscan scanner while rotating the tabletop to pick up all surfaces of the object.
During the scanning operation, it’s possible to view the new scan in real-time to verify that all surfaces have been successfully scanned.
Quality Control Measures for Replacement Part Scanning
In addition to providing the necessary blueprint for the 3D printer, the mesh file is used to identify potential issues or problems with the design before it is printed.
The new object mesh file offers the option to edit the settings and tolerances to customize the output according to specific needs. The resulting 3D model can be optimized for different applications, such as rapid prototyping, reverse engineering, or quality control.

Accurate 3D scanning can be achieved in parts containing narrow spaces. The object scanning accurately captures every detail of objects. 3D models are constructed in a very short amount of time with the help of our 3D measurement instrument.
Scanning specifications:
| Accuracy | Up to 0.050 mm (0.0020 in) |
| Volumetric accuracy | 0.050 mm + 0.150 mm/m (0.0020 in + 0.0018 in/ft) |
| Measurement resolution | 0.100 mm (0.0039 in) |
| Measurement rate | 1,500,000 measurements/s |
| Part size range (recommended) | 0.1–4 m (0.3–13 ft) |
The Benefits of Reverse Engineering for Replacement Parts
One of the advantages of the 3D scanner is its ability to capture every detail of the objects being scanned. With high precision sensors and advanced software, it can detect even the smallest imperfections, such as scratches, dents, or surface irregularities. This level of accuracy makes it suitable for applications that require precise measurements, such as quality control, reverse engineering, or scientific research.

Our 3D scanning will save time and effort compared to traditional methods, such as manual measurements or physical molds. The resulting 3D models can be used for a variety of purposes, from visual inspection to virtual prototyping.
Overall, the Simscan scanner 3D measurement instrument is a powerful tool that offers speed, accuracy, and versatility for 3D scanning applications.
Say goodbye to tedious manual measurements and physical molds – our scanner saves time and effort.
Whether you’re in quality control, reverse engineering, or scientific research, our scanning capabilities will deliver the results you need for precise measurements. And with the resulting 3D mesh file, you can inspect and prototype virtually, saving even more time and resources.